Deployment
Deployment documentation:
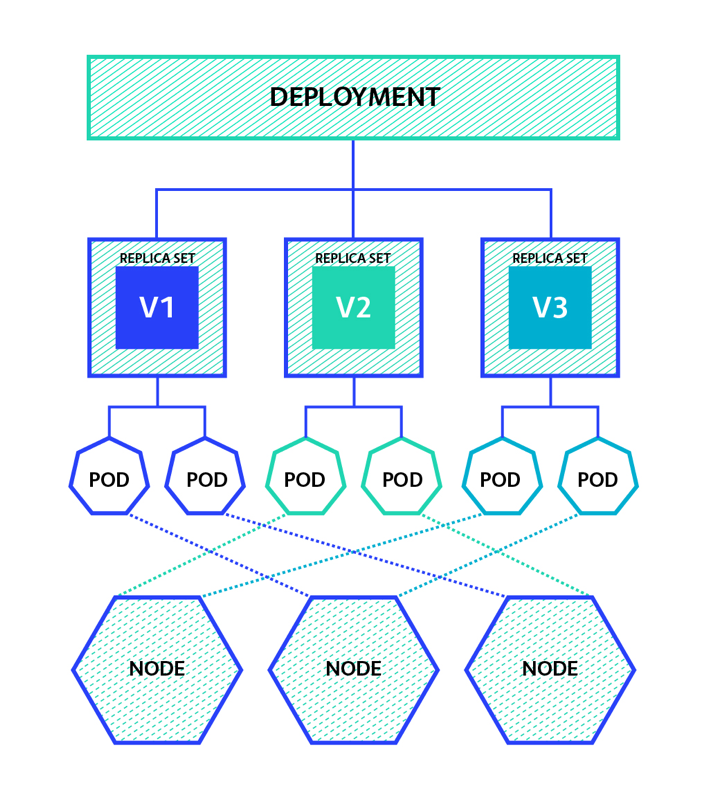
A Deployment is the result of someone deploying a Pod to the cluster.
A couple of useful features of a Deployment is:
- A deployment ensures that your pod always is running. If it crashes or stops responding, Kubernetes will deploy a new pod and kill the old one.
- You can scale up your app to handle more load. For instance, you can set the number of replications of a pod to 3. Then Kubernetes will create a total of three copies of your pod (and ensure that they’re always running), and then load balance every request between those 3 pods.
- You can rollback a deployment to a previous version.
YAML
Previous in this tutorial we created a pod using kubectl run. It’s also possible to create any resource
(pod, deployment, etc) using YAML, which is what we will do here.
A deployment looks like this:
apiVersion: apps/v1
kind: Deployment
metadata:
  name: # Some name
  labels:
    app: sample-app
spec:
  replicas: # Number of replicas here
  selector:
    matchLabels:
      app: # Put a label here for your app
  template:
    metadata:
      labels:
        app: # Put the same label here
    spec:
      containers:
      - name: sample-app
        image: nginx
        imagePullPolicy: Always
        ports:
        - containerPort: 8080
        env:
        - name: POD_NAME
          valueFrom:
            fieldRef:
              fieldPath: metadata.name
        - name: NAMESPACE
          valueFrom:
            fieldRef:
              fieldPath: metadata.namespace
The env part is not required, we’re just using that for our example to inject the pod’s name and its
namespaces to the docker container’s environment variables.
Task: Create deployment
Create a deployment using the docker image torklo/workshop-api. Its name should be
workshop-api-deployment, and it should be exposed at port 8080.
Solution
# Watch results
watch kubectl get deployment

# Put the content in the YAML below into a file, workshop-api-deployment.yaml
kubectl apply -f workshop-api-deployment.yaml
Switch back to first terminal, and observe that the deployment is created.
apiVersion: apps/v1
kind: Deployment
metadata:
  name: workshop-api-deployment
  labels:
    app: workshop-api
spec:
  replicas: 1
  selector:
    matchLabels:
      app: workshop-api
  template:
    metadata:
      labels:
        app: workshop-api
    spec:
      containers:
      - name: workshop-frontend
        image: torklo/workshop-api
        imagePullPolicy: Always
        ports:
        - containerPort: 8080
        env:
        - name: POD_NAME
          valueFrom:
            fieldRef:
              fieldPath: metadata.name
        - name: NAMESPACE
          valueFrom:
            fieldRef:
              fieldPath: metadata.namespace
Task: Delete a pod in the deployment
- Delete a pod in the deployment you just created.
- Watch it get recreated automatically.
Solution
Stop the watch command from above, and instead run
watch kubectl get po
Now, this command should output something like:
NAME                                       READY     STATUS    RESTARTS   AGE
workshop-api-deployment-68d5f769c5-pqr2h   1/1       Running   0          1m
Delete the listed pod. In this example, the command is:
kubectl delete po workshop-api-deployment-68d5f769c5-pqr2h
and watch the watch output.
You should see something like this:
NAME                                    READY     STATUS              RESTARTS   AGE
workshop-api-deployment-864bcb76f-9c7gn   0/1       Terminating         0          1m
workshop-api-deployment-864bcb76f-pg9jk   0/1       ContainerCreating   0          <invalid>
Awesome, Kubernetes is auto creating a new pod since the first was killed.
Task: Create 3 replicas
In workshop-api-deployment.yaml, modify replicas: 1 to replicas: 3. Then do:
kubectl apply -f workshop-api-deployment.yaml
Watch the watch output, and enjoy watching Kubernetes scaling up our app!
Task: Create a deployment for the front end
Create a new deployment that uses the image: torklo/workshop-frontend
You can creat a new yaml file from scratch if you want. Altough real dev oppers use kubectl create deployment (--help for more information)
kubectl create deployment --image=torklo/workshop-frontend ez-frontend
You should save the generated deployment as a yaml file: kubectl get deployment ez-frontend -o yaml > frontend-deployment.yaml